|
| |
Rev-A-Shelf Lazy Susan installation instructions
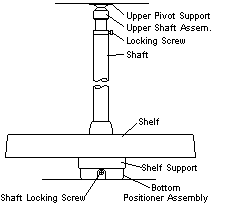
INDEPENDENTLY ROTATING 6270 SERIES
UPPER PANTRY SHELF SYSTEM
- Locate with template provided and install bottom
positioner on cabinet floor with four (4) 3/4" x 8 oval head
screws.
-
Locate with template provided and install upper
pivot support with four (4) x 8 truss head screws.
- Slide upper shelf onto shaft. Slide second
positioner onto shaft and temporarily tighten screw with
positioner approximately 10 inches from bottom end of shaft. Slide
bottom shelf onto shelf.
- Lift shaft and shelves into cabinet and insert
lower end of shaft into bottom positioner assembly and then lower
bottom shelf until it rests on positioner.
- Slide upper shaft assembly into upper end of
shaft. Assemble locking screw and lift upper shaft assembly to
engage in upper pivot support. Tighten locking screw.
- Lift lower shelf and tighten shaft locking screw
in bottom positioner assembly.
- Adjust upper shelf positioner by grasping and
supporting second positioner assembly while loosening locking
screw. Rotate positioner and shelf into alignment and securely
tighten locking screw.
|
 |
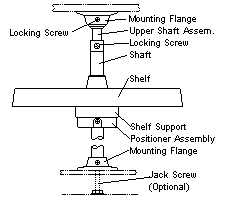
INDEPENDENTLY ROTATING 6260 SERIES
LOWER PANTRY SHELF SYSTEM
- Locate with template provided and install upper
and lower mounting flanges with four (4) 3/4" by 8 oval head
screws.*
- With shaft in a horizontal position, alternately
slide shelves (flat side down) and positioner (wheel) assemblies
onto shaft at spacing desired. Engage positioner wheels in shelf
support cam groove and tighten locking screw. Repeat for each
shelf and positioner make up.
- Slide Upper Shaft Assembly into upper end of
shaft. Assemble locking screw.
- Lift shaft with assembled shelves into cabinet
and engage lower end of shaft into bottom mounting flange socket.
Lift upper Shaft assembly to engage in upper mounting flange.
Tighten both locking screws. Rotate shaft so that flat on shelf is
parallel to back of cabinet.
- Adjust shelf positioner as necessary by
supporting positioner assembly while loosening locking screw.
Raise or rotate positioner into alignment and securely tighten
locking screw.
- * Mounting flanges are tapped for jack screw
accessory. If used, drill 1" diameter hole through bottom
floor only.
|
 |
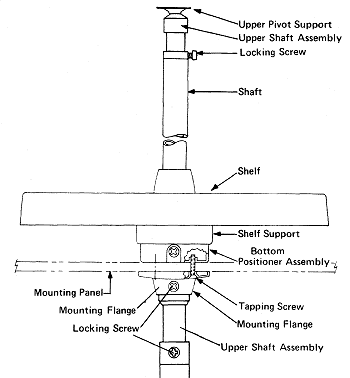
Required When Mounting Full Round 6270
Upper Pantry Shelf System
Directly Above 6260 Series Lower Pantry Shelf System
- Using template provided, drill four (4) each
7/32" diameter holes through the mounting panel.
- Use four (4) each 10-32 by 1" oval head
self-tapping screws to fasten mounting flange to the positioner
assembly.
- Locate screw holes with template provided and install
lower mounting flange for the Lower Pantry Shelf System with four
(4) each 3/4" by 8 oval head screws.*
- Proceed with steps 2-5 of the installation
instructions for the 6060 series Lower Pantry Shelf System.
- Locate with template provided and install upper
pivot support for Upper Pantry Shelf System with four (4) each
1/2" by 8 truss head screws.
- Proceed with steps 3-6 of the installation
instructions for the 6270 Series Upper Pantry Shelf System.
* Mounting flanges are tapped for jack screw
accessory. If used, drill 1" diameter hole through bottom floor
only.
|
 |
|